


Diaper rash is a common, usually short‑lived irritation of the skin in the diaper area. This practical, ready‑to‑publish guide explains an effective diaper rash home remedy routine: how to reduce moisture and friction, soothe inflamed skin with gentle natural options, prevent recurrence, and recognize when medical care is needed.
What is diaper rash and why it happens
Diaper rash is skin inflammation caused by prolonged contact with moisture, friction from the diaper, exposure to urine or stool, heat, or reactions to products. Sometimes bacterial or yeast infections develop and need medical treatment. Identifying the trigger — wetness, a new product, a food change, or prolonged contact with stool — helps you choose the best home remedy and avoid repeat episodes.
Signs and severity
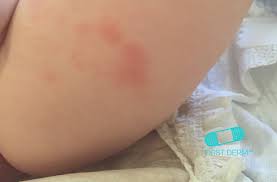
- Mild: pink or red patches, slight fussiness.
- Moderate: larger red areas, tenderness, persistent crying with diaper changes.
- Severe: blistering, open sores, pus, bright red shiny patches in skin folds (suggestive of yeast), or fever and poor feeding which need urgent attention.
Monitor the rash daily and photograph progress for easier assessment or to show a clinician.
Immediate diaper change routine
These four actions are the backbone of any diaper rash home remedy and should be followed at every change.
- Clean gently — Use warm water and a soft cloth or fragrance‑free wipes; avoid rubbing.
- Dry thoroughly — Pat dry; leave the diaper area uncovered for a minute if possible to air dry.
- Apply a barrier — Use a thin layer of zinc oxide paste or petroleum jelly at every change.
- Change promptly — Replace diapers immediately after soiling and at least every 2–3 hours for wet diapers.
Consistent application of this simple routine often leads to improvement within 48–72 hours.
Best natural home remedies and how to use them
Zinc oxide or petroleum barrier
- Benefit: Creates a protective seal between skin and irritants.
- How to use: Apply a thin, even layer to clean, dry skin during every diaper change.
Air time
- Benefit: Reduces heat and moisture, accelerates healing.
- How to use: Supervised diaper‑free sessions for 10–30 minutes, several times a day.
Warm water cleansing
- Benefit: Gently removes stool and urine without stripping skin oils.
- How to use: Use a soft cloth soaked in warm water; avoid soaps or alcohol wipes that dry the skin.
Colloidal oatmeal bath
- Benefit: Soothes itching and inflammation.
- How to use: Add finely ground colloidal oatmeal to a shallow warm bath for 10–15 minutes; pat skin dry and apply a barrier.
Virgin coconut oil
- Benefit: Natural moisturizer with mild antimicrobial properties.
- How to use: Apply a thin layer after cleaning; discontinue if irritation increases.
Pure aloe vera gel
- Benefit: Calms inflamed skin and supports soothing.
- How to use: Apply small amounts of fragrance‑free gel; patch test first to rule out sensitivity.
Expressed breast milk
- Benefit: Anecdotally soothing with mild antimicrobial activity.
- How to use: Dab a few drops on the rash and let air dry for mild irritation.
Cornstarch for chafing
- Benefit: Reduces friction when skin is not broken.
- How to use: Lightly dust around dry skin only; avoid on open sores and avoid inhalation.
Introduce one new remedy at a time and stop any that cause increased redness or swelling.
When to avoid home remedies and seek help
- If the rash is painful, blistered, or oozing.
- If bright red, shiny patches appear in skin folds (possible yeast infection).
- If the baby develops a fever, refuses feeds, or seems unwell.
- If there is no improvement after 3 days of consistent home care or the rash worsens.
Yeast and bacterial infections often require prescription antifungal or antibiotic treatments. A pediatrician can confirm the cause and recommend the correct medication.
Daily prevention checklist
- Change diapers quickly after soiling and more often during diarrheal episodes.
- Use breathable, well‑fitting diapers and cotton clothing.
- Apply a thin barrier at every change until the rash heals.
- Avoid scented or alcohol‑based wipes and harsh soaps.
- Introduce new products one at a time so you can detect reactions.
- Keep a photo log to monitor progress or show a clinician.
72 hour action plan
- Day 1: Stop potential irritants, start frequent changes, gentle cleansing, zinc or petroleum barrier, and air time.
- Day 2: Continue routine; add colloidal oatmeal baths twice daily and apply coconut oil or aloe for comfort if needed.
- Day 3: Reassess—if improved, maintain care until fully healed; if not improving or worsening, contact your pediatrician.
Frequently asked questions
- How quickly will a diaper rash improve with home remedies?
Most mild rashes resolve within 48–72 hours with consistent gentle care. - Can I use coconut oil on newborns?
Virgin coconut oil is generally safe for newborns but perform a patch test and stop if irritation occurs. - When is a rash likely a yeast infection?
Bright red, raised patches that are worse in skin folds and resist standard care suggest yeast and need medical treatment. - Can breast milk really help?
Many parents report soothing benefits for mild irritation; it is safe to try for minor rashes.
Conclusion
A consistent diaper rash home remedy routine that focuses on frequent changes, gentle cleansing, a protective barrier, air time, and targeted natural soothers such as oatmeal baths and coconut oil will resolve most cases. Watch for red flags and contact your pediatrician when the rash is severe, persistent, or shows signs of infection.